
Microsoft Loop brings together teams, content, and tasks across your apps and devices, explains Shelley Fishel
Are you trying to keep track of multiple contributions or votes, or perhaps you’re in need of others’ input? With so many Microsoft 365 apps for collaboration, it can be challenging to remember what you shared, with whom, and their actions.
Enter Microsoft Loop – a cloud-based collaborative canvas. Share components to see real-time updates from colleagues. Use Shared Spaces to work together, collect documents, brainstorm, and manage tasks.
Leverage Loop’s templates to kickstart meetings or projects – they guide you on what you need.
Loop lives online, although you can access it on your desktop via the Loop app. This is a PWA (persistent web app) that sits as a shortcut on your taskbar and takes you directly to the online Loop application.
Whilst Loop is predominantly a work application, it is available with some functionality for personal Microsoft accounts. This article will be looking at work accounts only.
To get to Microsoft Loop
Access Microsoft Loop via the web, on your mobile device, or on your desktop.
To get started, visit www.loop.microsoft.com and sign in with your work account.
Note that to use Microsoft Loop, your IT administrative team will have to enable it and assign licenses. It is part of Microsoft 365, so no added outlay is needed.
Use Loop in the browser or download the desktop application and pin it to your taskbar so that it is always ready to use.
To use Microsoft Loop on your mobile device, go to the Apple Store or Google Play store and download the app. Then log in with your work account – now you will have access to all the Loop workspaces, pages, and components wherever you are.
What Is Loop Made Of?
Workspaces – Places to bring all the things that make up a project together.
Pages – Flexible canvas to brainstorm, add components, and collaborate.
Components – Individual elements on a page that can be shared when you don’t need to share the whole page. Components can also be shared in Outlook, Teams, and Word Online documents – making collaboration even easier.
Ideas – This is a place for you to jot down your own ideas and start to work on something before you are ready to share. Components that you add to your Ideas area can then easily be added to a page or a workspace.
Loop First Look
When you first log in to Microsoft Loop, you will have one workspace called Getting Started along with an area for pages and ideas.
In the screenshot below, you will see that I have two workspaces, Getting Started and My First Test Space.
This is shown using the Loop app on my desktop.
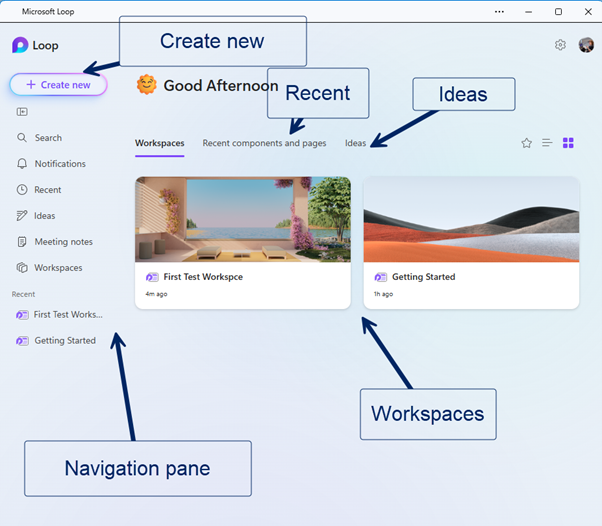
When you click on Create New, you decide whether to create a new page in your Ideas section or create a new workspace.
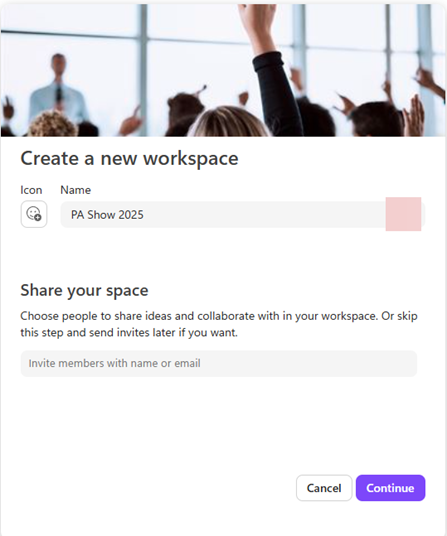
I will create a new workspace to keep track of what I need to do for the next PA Show in February 2025.
First off, I name it and change the cover. I can also give it an icon as part of the title.
When I click Continue, I will be asked to add a description of what the workspace is for so that it is quite clear what the intention is. I can also add any files to the workspace at this point. Loop will suggest files, although they are not always quite right.
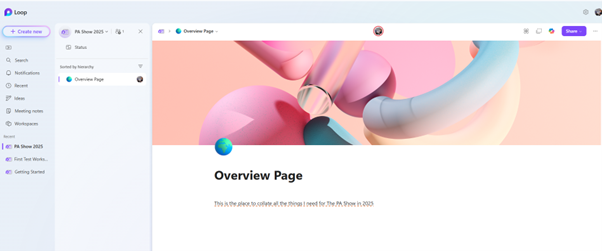
Now that I have my workspace, I will need to rename the first untitled page and start adding to it. I might want to create subpages, and I will ultimately want to share if not the whole shebang, at least some of the components.
At this point I can also decide whether to use one of the page templates or to build up my own.
I have renamed the page and added a cover updated from the randomly generated images by Loop.
To add content to your page, just start typing. Format text by selecting it and using the pop-up ribbon to select what you need.
Adding Content
To add anything other than text, first type a forward slash: / and then choose from the options on offer.
There are many options:
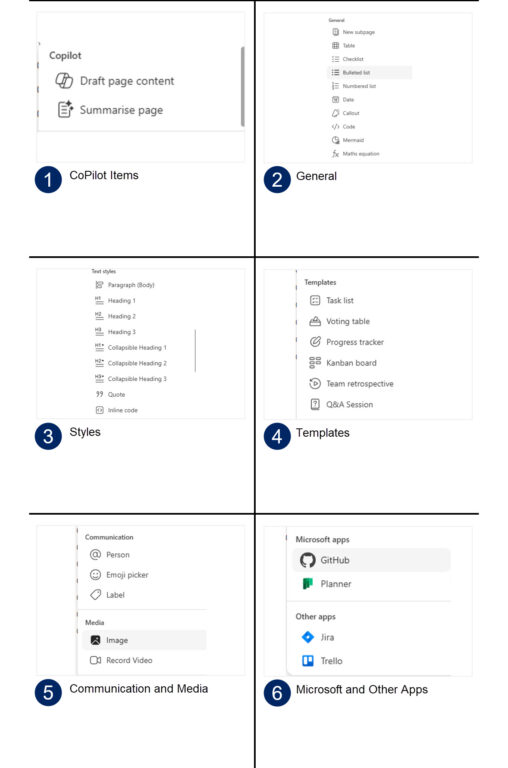
As I am preparing for The PA Show 2025, I need a list of all the items I have to pack. For this I will choose Checklist and then start to type. I am also going to add the presentation I used at the 2024 PA Show, which I will modify or use as a starting point when I begin to prepare in earnest.
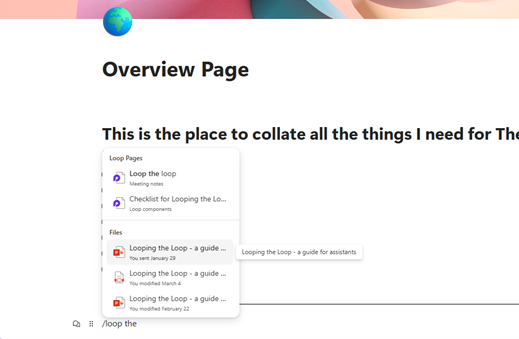
Having added the slide deck, I have instant access to it whenever I open Loop, so I no longer need to remember where I saved it!
Sharing
When working with others, you have the choice of what you share.
Click Share and choose what you wish to share with your colleague(s).
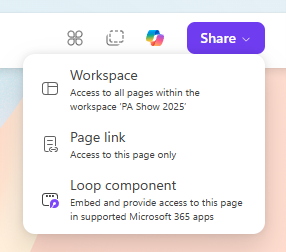
Workspace – This shares a link to the entire workspace, including any other pages that exist.
Page Link – Shares a link to the page only and not to anything else in the workspace.
Loop Component – Adds the page inside a container which is live and ready for interaction with the recipient(s) immediately.
Here is what they each look like when you share them – shown in Outlook here.
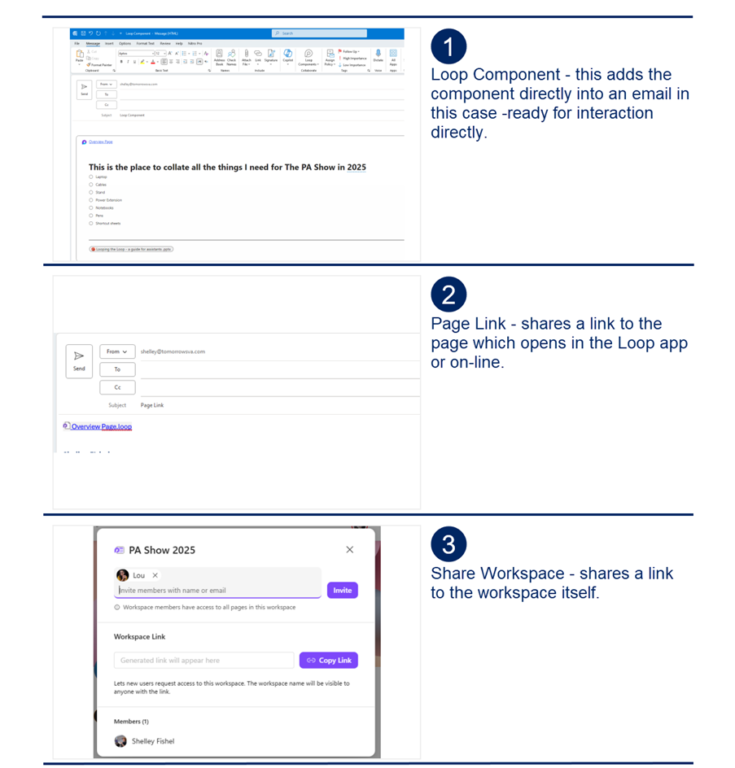
Before you share the item, you will need to make sure that you have granted access to the component or page to everyone you share with.
When you share the workspace by inviting a member of your team, they get access to everything in the workspace, and you will be able to see in real time what they do.
The same goes for sharing a Loop component.
In the screenshot below, you will see that I shared the Loop component with Lou in an email, and I can see what she is doing in Loop when she fills things in via the component in the email.
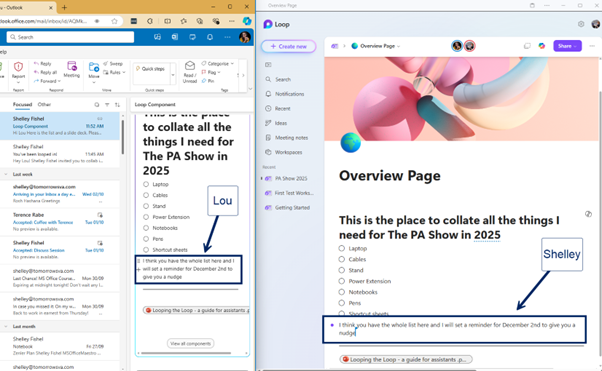
This is very powerful – the work happens in real time. If I go away and do something else, I will see what Lou has been up to when I next log in to Loop.
Sharing Externally
Sharing is enabled within your organisation and will adhere to any security settings put in place by your IT department. External sharing is allowed and will also respect your organisation’s security policies.
If your page, component, or workspace includes files, as in my example, you will need to make sure that you have given external collaborators access to the files before you invite them to the workspace or share a page or component with them. If the items on the page are not shared, then they will not have access.
The external collaborator will also need to authenticate their access and will need a Microsoft account connected to their email account.
Collaborative Notes
One of the most useful features of Microsoft Loop is the ability to create a Meeting Agenda that everyone can add to before a meeting or use to take notes in the meeting and assign tasks – making minute-taking that much quicker.
This is a Microsoft Loop feature, and so long as you have Loop enabled, you will be able to use it.
Before the meeting
When you create the meeting invite, you will have a small Agenda icon at the bottom, which is a Loop component. You can set the agenda and have invitees add to it, plus you can set up follow-on tasks and assign them should you wish to.
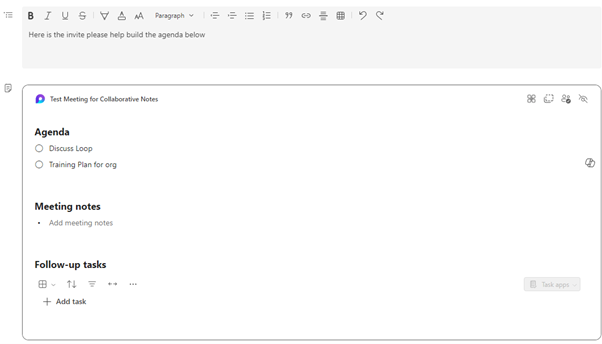
Once we have both joined the meeting, we can add notes as we go and assign tasks.
The tasks assigned will be added to Microsoft Planner.

Remember that everyone can see the notes and add to them, so it could get messy! Best decide who is doing it ahead of time.
Note that external participants will not see or be able to interact with the notes.
Conclusion
In this introduction to Microsoft Loop, we have seen what Loop is, how it works, and how you can share different parts of it with others. I advise you to start playing with it and see how useful it is.
Will you be adopting Loop?


