
Marie Herman explains the Outlook functions that can help you get (and stay) on top of your email inbox
As an administrative professional, it can feel as if when you turn your back for a minute, the emails pile up in your inbox. Some have even had the unfortunate experience of taking on a new executive and discovering that they have literally thousands of old emails in their inbox. Maybe it’s your inbox that has thousands of emails in it! How do you get it under control?
A while back, that inbox was mine. I had more than 25,000 emails that had accumulated in my inbox and it was driving me insane. There are a number of different ways you can choose to organize emails.
Here are a few of the classic methods:
- Have all emails in your inbox. Just search for the ones you need.
- Have all emails to be acted upon in your inbox. Move emails that have already been addressed to one archive folder to store for later reference if needed.
- Store all emails in appropriately categorized folders based on subject (such as by project name or dates of travel/trips, etc.).
- Store all emails in appropriately categorized folders based on action needed (to read, to reply, etc.).
- Store all emails in appropriately categorized folders based on time of response (respond today, this week, this month, etc.).
Each of those methods has pros and cons, but really, they all come down to personal preferences and what works best for you (or your executive) personally. In my own case, I am a trainer who owns my own business. I found subject folders to be most helpful, and then date-based class folders (since I teach webinars and study groups every week, I have LOTS of separate classes to track).
But I am not here today to talk about those overall methods of organizing emails.
Instead, I want to focus on some of the specific functions I used in Outlook to whip my own inbox into shape. You could, of course, if you chose, go through those emails one by one, processing each one, and eventually you would get through them all. Occasionally I did that, but more often, I chose to use Outlook’s built-in functionality to speed up the process. I often skipped between options depending on what the individual emails were about. Let’s go through some of the features I used. Please note this article is written for Outlook Desktop, which provides more functionality than the online or mobile versions of the software. Some of the options are also available in Gmail (but not all of them).
Folders
Because I started with so many emails and I knew I wanted to process and move them to folders, I decided to start by separating my email into subfolders by year (2020, 2021, etc.). You can use the standard Windows shortcut of clicking on the first email, holding down the Shift key, and then clicking the last email in the set to select the whole range of emails; then just click and drag the highlighted emails to the appropriate folder.
Doing this enabled me to stay on top of new emails that came in while gradually working through the backlog of older emails. Naturally, the older the emails, the quicker they ended up being processed, since they were normally already responded to and just needed to be either deleted or filed.
To make it even easier, I added the folder I was currently working through to my favorites list in the top of my navigation pane. Just right-click on the folder name in the left navigation pane and then select Add to Favorites to do that.
I wanted my folders to be alphabetical, but sometimes I wanted a few certain folders at the top of the list. While I could have clicked and dragged to move a folder to a different location, it would have been overwritten anytime I did a sort of the folder names. Here’s a little tip: add a period at the beginning of the folder name; Outlook places punctuation prior to alphanumeric characters when sorting alphabetically.
Conversation Clean Up
Next, I used the Conversation Clean Up function to clean up many of the old emails in each folder. When you send an email and someone replies, and then you reply to that person, you can end up with multiple copies of emails – the original and then the original and replies included in subsequent replies. Outlook’s Conversation Clean Up function will delete the original or any reply messages if they are fully self-contained in later reply threads. This can be an enormous time saver.
Note: It doesn’t delete those original messages if they have an attachment or were digitally signed. It also recognizes when someone has modified the original (like if they intersperse their comments throughout your original message instead of at the top of the email).
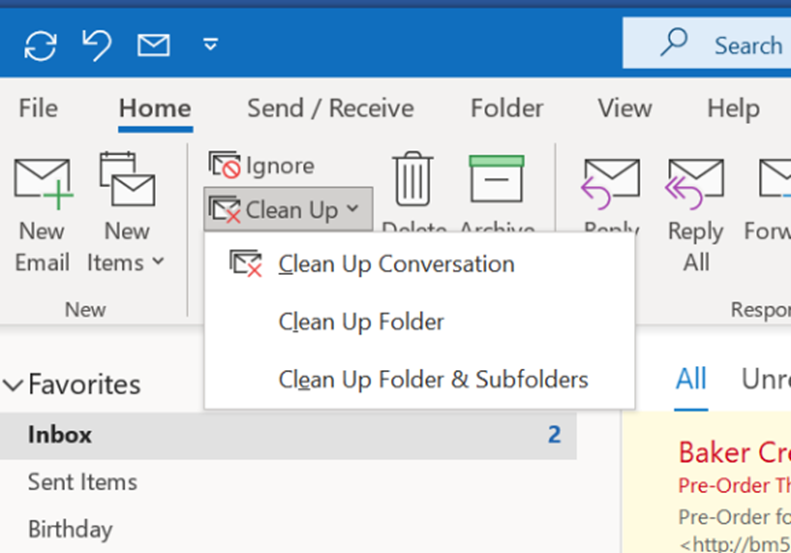
To access the Conversation Clean Up function, click on the Home ribbon, then Clean Up. The dropdown gives you the choice between cleaning up the individual email you are currently on, the folder you are in, or the folder you are in plus all subfolders to that folder as well.
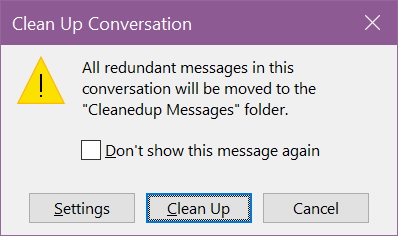
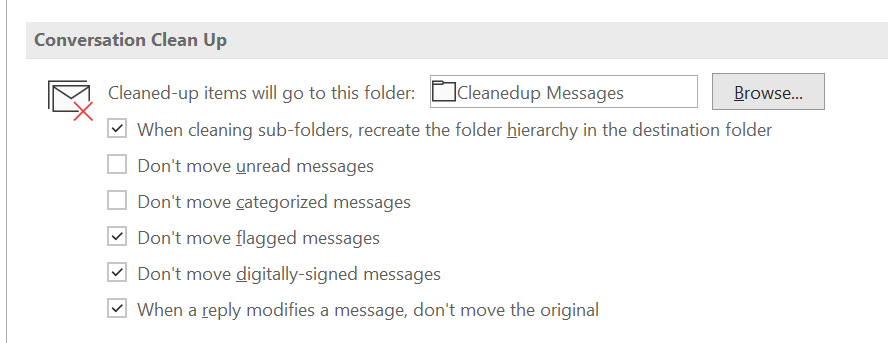
After you select an option, the Clean Up Conversation pop up window will open. Note the button for Settings. You can go to the settings and designate a particular folder to move your conversations to, instead of deleting them. That might help you feel more at ease with using this function. You can also change settings like if you want to leave messages that you have not read yet or messages that were flagged for follow-up, for instance.
Sorting
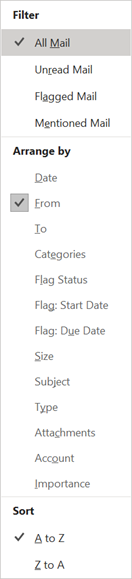
Next, I sort the folder. Go to the View ribbon and select your choice from the Arrangement gallery (click the dropdown arrow at the top of your emails next to how your folder is currently sorted). Depending on my emails, I would usually start with sorting by the From field, but I also have found the Subject field to be very useful. Note that you could choose to filter out emails that you have already read, but most of the time I preferred to see all emails.
Groups and Expand/Collapse
I turn grouping on while working in the folders. To do this, click the dropdown arrow in the bottom right corner of the View ribbon – Arrangement gallery, and make sure there is a checkmark next to Show in Groups. The checkmark will toggle on and off when you select that option.
Groups add a grouping title to each change in item for your sort order. It will group your emails by the person’s name if you sort on the From field or by the date (this week, last week, etc.). The advantage of doing this is that it provides a one-click way to impact all the messages in that group. If you click on the title bar at the top of each group and then do something like click Mark Read or Unread or Delete or move that group to a folder, it will apply that action to all the emails in the group at one time. This can be much more efficient than taking action on emails one at a time.
When you have Groups turned on, you can then expand or collapse folders individually or all at one time. To collapse or expand a single group, just click on the caret to the left of the group title name. It will toggle it open and closed. To collapse or expand all groups at one time, either right-click on the folder name and select the appropriate action at the top of the menu or click the Expand/Collapse dropdown option to the right of the Arrangement gallery on the View ribbon.
This can make a large folder seem much less overwhelming.
The collapsed view will also tell you how many unread emails are in each folder. I made ALL the emails in the folder Unread (right-click on folder name in the left navigation pane and then click Mark All as Unread to do this). This way, I could see a grand total next to the folder name, plus I could see the individual group totals next to each grouping. I know that might feel scary, but I found it very helpful.
When I wanted to do “quick wins” of processing a bunch of emails fast to reduce the numbers in the folder, I would do a quick scan of the collapsed folder names, looking for easy deletes. For example, if I have placed an order with a store, I might be on their mailing list. I could end up with dozens of emails from that store, all of which are outdated sale notices. I would give a quick scan of the email subject lines to verify there wasn’t something important like an order confirmation, and then I would just delete the entire group at one time. Doing this to 10-20 similar types of groups would knock down that folder substantially.
Filters
Outlook enables you to filter messages in many ways. One of the quickest and easiest is to right-click on any email and then select from the menu Find Related.
Find related messages in the conversation
This will find messages with the same subject line (including RE: or FW: but NOT including emails with extra words added to the subject line like (EXTERNAL) or (SPAM)).
Find related messages from sender
This will find all messages from that email address.
What’s nice about this feature is that it will pull in messages from across your entire inbox, not just the folder you are currently in. If you wanted to delete that vendor email I mentioned earlier, you could use that technique to find all messages from that sender across all folders and remove them quickly (again, always scan the subject lines to verify before deleting).
Outlook has several other ways you can apply filters. On the Home ribbon, go to the Find group and then click the Filter Email dropdown to find other options.
Organize/Reduce Future Emails
You can help keep yourself on track with future emails by taking advantage of the built-in automation that Outlook offers.
Quick Steps
Create a quick step to save yourself some mouse clicks. It is only applied when you tell it to run. While in email, go to Home, then in the Quick Steps group, click the dropdown and Create New Quick Step. Give it a name and then choose an action type from the list. Repeat to include all the actions you want to happen. Then going forward, when you want to apply that quick step to an email, just make sure that email is the one you have selected and click the name of the appropriate quick step. You can rearrange the order of the quick steps by clicking on the gallery dropdown and selecting Manage Quick Steps. While quick steps are useful, they are much more limited in functionality compared to rules.
Rules
Rules are a series of actions applied automatically when certain criteria are met. For example, you could create a rule that would mark a message as read, forward a copy to your planning committee, apply a category of Holiday Party and move the message to your Holiday Party folder and more. To create a rule, click on the Home ribbon, then Rules – Create Rule. The initial window that pops up has the most common options, such as moving messages to a folder when they are from a certain person, but to get to the full range of choices, click Advanced Options in the bottom right corner. This opens the Rules Wizard, which will walk you through the steps of setting up a rule.
The biggest difference between Rules and Quick Steps is that Rules have far more functionality and are automatically applied when the criteria is met, whereas Quick Steps are only applied when you tell them to be applied.
Unsubscribe
One of the best ways to reduce your future workload is to get into the practice of not just deleting messages, but unsubscribing from lists when you are not interested in receiving emails. Any legitimate email service provider will have an unsubscribe link included at the bottom of the email message. This is required for email management companies (by law). So just scroll down and check for it in the often very tiny type at the bottom of the message.
One caveat, though: if the email is clearly spam, do not click the unsubscribe button, as that just confirms that your email address is legitimate, and it’s quite possible your spam email will increase if you do that. If you use all these tips to work through your backlog of emails, I think you’ll find they will get processed much more quickly than you ever expected. Just set a little time aside every day or week to work on the backlog and it will get smaller and smaller. You’ll be amazed at how fast it can go when you get started.


Excellent procedures! Emails are so overwhelming for everyone and there should be at least one takeaway from this awesome article! Thanks again Marie for tackling technology!