Karen Roem shares four options to personalise and improve the way AutoCorrect works for you
A priest, a rabbit and a minister walk into a bar. The bartender asks, “What’ll ya have?” The rabbit says, “I dunno. I’m only here because of AutoCorrect.”
AutoCorrect can be an extremely useful and time-saving feature, automatically correcting common typos, such as comitee and recieved.
But what about those times that it makes unwanted corrections? AutoIncorrect!
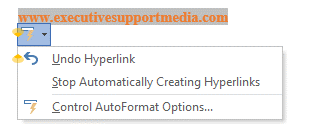
Perhaps you don’t want an email or web address to be turned into a hyperlink. OK, you can simply press BACKSPACE on your keyboard to undo the change. Or – if you think of it – the last thing that happened was AutoFormat, so you could also click the Undo button or press CTRL + Z.
If you find AutoFormat irritating, you can turn it off completely, but let’s look at four options you might want to consider…
1. Stop Automatic Formatting As You Type
You may remember Clippy, the animated paperclip killed off by Microsoft in 2003. It might have been annoying, but it offered some great time-saving features that were not easy to ignore.
Clippy, Rocky the Dog, Links the Cat, The Genius or whatever Office Assistant you had selected were replaced by tiny smart tags. So next time something gets the AutoFormat treatment and you spot it, look out for “Clippy in disguise”, click the tiny AutoCorrect Options button that appears when you hover over the correctionand check out the list of choices.

2. Switch Off Certain AutoFormat Settings
If you did not spot the AutoCorrect Options button described above, you can change the settings from the File tab.
- On the File tab, click Options.
- Click Proofing or type the letter p. (In Outlook, click Mail, and then click Editor Options.)
- Click the AutoCorrect Options button.
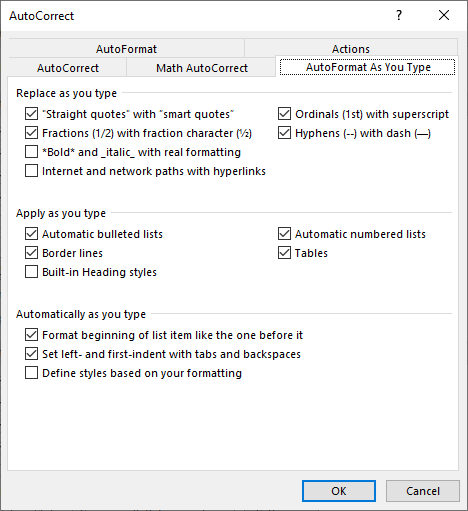
- On the AutoFormat As You Type tab, untick the Internet and network paths with hyperlinks checkbox.

3. Delete Unwanted AutoCorrect Entries
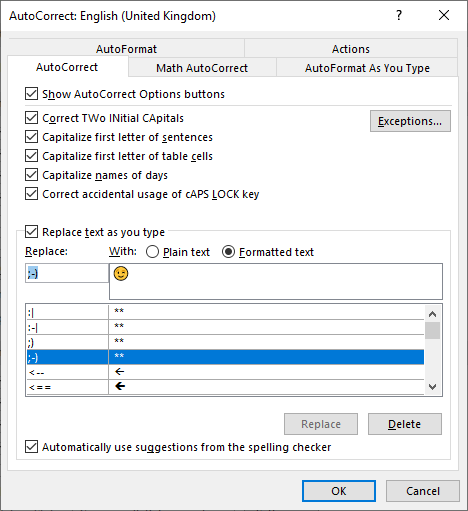
The standard AutoCorrect list might contain entries you want to remove. Perhaps you prefer to use the “sideways smileys” introduced 39 years ago by Scott Fahlman, who proposed the use of the character sequence 🙂 to flag jokes. Nowadays, AutoCorrect will automatically convert these to emojis, but if you prefer the old-fashioned smileys, you can delete the entry.
- On the File tab, click Options.
- Click Proofing or type the letter p. (In Outlook, click Mail, and then click Editor Options.)
- Click the AutoCorrect Options button.
- On the AutoCorrect tab, scroll down to the AutoCorrect entry you want to delete and click the Delete button.

4. Stop Capitalising Text Following Specific Abbreviations
Office automatically corrects typical capitalisation errors. For example, it will automatically capitalise names of days and the first letter following a full stop or exclamation or question mark.
If you use a lot of specific acronyms or abbreviations which include punctuation, you might need to introduce exceptions.
- On the File tab, click Options.
- Click Proofing or type the letter p. (In Outlook, click Mail, and then click Editor Options.)
- Click the AutoCorrect Options button.
- On the AutoCorrect tab, click the Exceptions button.
- Type the word, including the punctuation (for example, Cambs.), in the relevant box on the relevant tab and click Add.
- Select any of the exceptions you want to remove and click Delete.
- Click OK (four times – not that I’m counting).
And don’t forget…
There’s always such a thing as human error.
Editing your own work can be tricky. Make sure you check your documents thoroughly by reading the text aloud. Or – if you are using Word for Microsoft 365 – you can have your computer do it for you. Simply click the Read Aloud button in the Speech group on the Review tab and watch each word as it’s read.


