
Traci Williams provides a comprehensive guide on how to leverage Excel macros to enhance your productivity
Every Executive Assistant knows that efficiency is the key to successful administration. With an ever-increasing workload, finding ways to streamline your tasks can be a game-changer. Enter Excel macros – an ACE tool within Microsoft Excel that is super powerful and can automate repetitive tasks and save you precious time.
Understanding Macros
A macro is a recorded sequence of instructions that tells Excel to perform a series of tasks. You can create a macro to automate almost any action or series of actions that you can perform in Excel. By using macros, routine tasks can be executed with a single command, improving efficiency and reducing the potential for errors.
The best way to understand this is: if there is a manual task that is long-winded, repetitive and requires no thinking whatsoever, that’s precisely where a macro can be used to perform the task instead.
Of course, macros are capable of much more than this too, but this is a great place to start!
Getting Started With Macros
There are two ways to create macros:
- Record the macro when going through the steps (easy & simple to follow)
- Write VBA code (difficult and scary to most people)
Let’s start with the first option, recording the macro:
Recording Your First Macro
Suppose you regularly perform a task that involves formatting a weekly report: bolding headers, adjusting column widths, and changing the format of dates. Rather than doing this manually every week, you can record a macro.
1. Click on the ‘View’ ribbon, then ‘Macros’, then ‘Record Macro’:

Top Tip: You could use the ‘Record Marco’ icon on the bottom left of the screen instead:
Clicking this will also take you to the next screen.
2. In the ‘Record Macro’ dialog box, give your macro a name (such as: Format_Report) – it must not include any spaces.
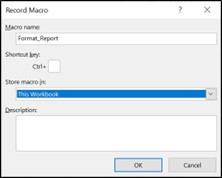
These elements are optional:
- Choose a shortcut key if you want to speed up the process further.
- Select where to store the macro. ‘This Workbook’ is a good place, as the macro will be available to anyone who opens this file.
- Write a brief description of what the macro does.
Click ‘OK’ to start recording the macro.
3. Now, every action you perform in Excel will be recorded until you click the ‘Stop Recording’ icon, which appears as a square on the bottom left of the screen.
So, go ahead and format your report just as you need.
Congratulations, you’ve just created your first macro!
Writing VBA Code
Macros are written in a programming language called Visual Basic for Applications (VBA). As mentioned above, we can create macros by writing the VBA code, but this requires a lot more knowledge and skills.
The method of ‘recording’ the macro means we simply press the buttons to achieve what we need, but in the background, Excel generates the relevant VBA code that corresponds with the actions we took.
To access the VBA Editor, go to the View ribbon, then ‘Macros’, then ‘View Macro’:

This will provide a list of macros for you to select from:

Make a selection and click ‘Edit’.
This will open up the VBA Editor as follows:
Top Tip: You can also open the VBA Editor by pressing ALT + F11.
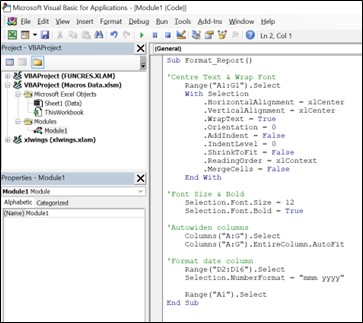
Here, you can amend the recorded steps or add new ones. In the above example, we could simply amend the line of code: Range(“D2:D16”).Select To:Range(“D2:D100”).
This would mean the code would still work if there were more rows of data in future.
You can also add ‘notes’ by placing an apostrophe ( ‘ ) at the beginning of the text, which will then turn green and not form part of the code. This is super helpful when returning to code, as it’s far easier to find what you need.
After reviewing or amending the VBA, simply press the X in the top right corner to close the VBA window and return to the spreadsheet.
VBA forms part of the spreadsheet and will be saved automatically when the spreadsheet is saved. You don’t need to save it separately before returning to the spreadsheet.
Running Your Macro
Regardless of the method chosen to create the macro, to run a macro, simply go to the ‘View’ ribbon, then ‘Macros’, then ‘View Macro’:

This will provide a list of macros for you to select from:
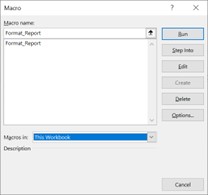
Make the selection and click ‘Run’.
Excel will automatically perform all the tasks you recorded.
If you assigned a shortcut key, you could also use that to run your macro, or alternatively you could assign the macro to a button instead.
Assigning a Macro to a Button
From the ‘Insert’ ribbon, select ‘Shapes’, then choose any shape and drop it onto the page wherever you like:
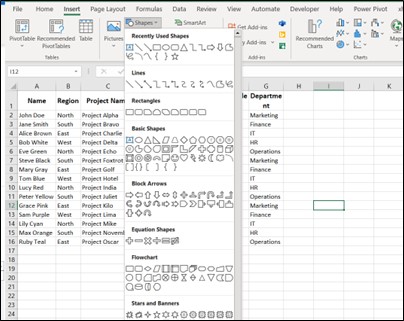
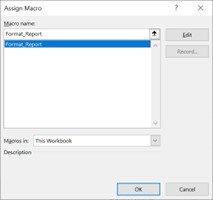
Select the shape, right-click the mouse and select ‘Assign Macro’, then choose the relevant macro to assign to the button and click ‘OK’.
Now when you hover over this button, you will see a hand icon to ‘press the button’ (by clicking left mouse) and the actions of the macro will be applied.
You can also ‘edit text’ on the buttons to give a name to the shape, making it super simple to differentiate and find the relevant macro buttons, and also direct others to them too.
The Power of Macros
The real power of macros comes when you use them to automate more complex tasks. For instance, macros can be used to automate data entry, enter formulas, print documents, loop through lists to generate invoices and more. The possibilities are virtually endless.
Macros can also interact with other programs – for example, Outlook, MS Word or PDF (and many more). I use them to create PDF documents based on the data in Excel, then attach the PDF document to an email, writing the body of the email to include specific data from the PDF.
As macros are run by a machine, not only do they complete tasks quicker than we could do things manually, but they also eliminate the risk of human error, making the process much more accurate. And of course, freeing up time for us to work on other things.
Security Considerations
Macros are super powerful, but they can also be misused to spread malware. Therefore, Excel has security features that, by default, disable macros. You can adjust these settings under File > Options > Trust Center > Trust Center Settings > Macro Settings.
Also, as macros can interact with other software programs, they can be seen as an unacceptable security risk within some companies and can be disabled completely. They are also NOT available at all if you use Excel Online.
An alternative resource that can be used instead is ‘Office Scripts’; these work in a similar way to macros but using the programming language TypeScript (a superset of JavaScript). They only work inside the current program and need to be used alongside Power Automate to access other programs. They are available with Excel Online but are fairly new, so not yet as advanced as VBA.
In conclusion, macros can be a real time-saving tool for any Executive Assistant. By automating repetitive tasks, you can focus on more strategic aspects of your work. Don’t be afraid to experiment with macros and explore the possibilities they open up for streamlining your administrative tasks. Happy automating!
NOTE: Excel workbooks containing macros must be saved with the file extension .xlsm, and you will be prompted to do this when you save the file.