
Traci Williams introduces techniques to give you confidence that your data accuracy is of a very high standard
As anyone working with data in Excel spreadsheets knows, keeping the information accurate is of vital importance in order to maintain its integrity and reliability.
Fortunately, there are several techniques that can be employed in Excel to help with this, and this article will explore them in more detail:
- Data Validation
- Conditional Formatting
- Removing Duplicates
- Cleaning Data
- Avoiding common data entry errors
Data Validation
Data Validation can be used to restrict what can be entered into a cell, effectively forcing a user to enter accurate or correct information. As this prevents incorrect data from being entered, it eliminates the need to make corrections or cleanse data.
Data Validation restrictions can include:
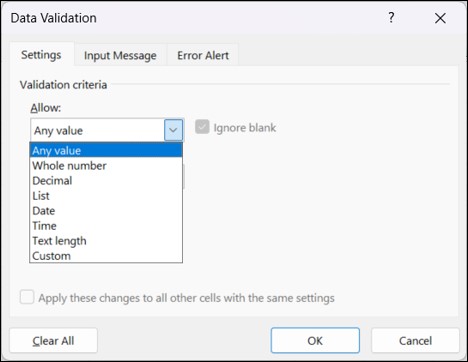
Within most of these options, it is also possible to further impose restrictions, such as start and finish dates, greater than and less than numbers, etc.
I often use Data Validation to create a ‘Pick List’ in a cell, which prevents users being able to enter anything that is not on the list. This prevents typos, abbreviations, shortened words, or any new items being used. It is also quicker for the user to enter the data, as they no longer need to type out the text, just select it from the list.
And, in the last couple of months, Microsoft has made an update to Data Validation: we can start typing into a cell (that contains Data Validation) and the list will narrow down to display only relevant items from the list. I am very excited to see this functionality; it’s probably been the most requested function by my clients over the years.
Data Validation also enables the user to include pop-up messages (when the cell is selected) to advise the user what to enter. Also, in the event of an error, you can write your own error message providing clear instructions as to what the issue is and how to resolve it.
Conditional Formatting
Whilst this function won’t prevent any mistakes, it can certainly help to highlight them, if there are any.
There are many different options to apply Conditional Formatting, as follows (from the Home ribbon):

A really useful application of this would be to highlight any duplicate values in the following data set:
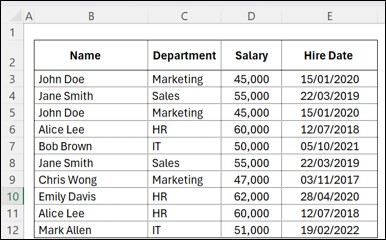
Simply select the cells to be formatted (in this instance, cells B3:B12), then select ‘Duplicate Values’ from the above menu.

Make the relevant selections, selecting either ‘Duplicate’ or ‘Unique’, then the required formatting. The cells in column B will automatically change colour as a duplicate is identified within that range.
Remove Duplicates
In this example, there are clearly a few duplicated rows (see rows 3 & 5 / 4 & 8 / 6 & 11):
We can very easily remove these duplicate rows as follows:
- Highlight all of the cells in the range (including the header row).
- Select ‘Remove Duplicates’ from the Data ribbon.

- All columns will be selected by default, but you can manually select the relevant columns where ALL data must be the same. Then press ‘OK’.

This will remove any duplicates that have been identified and advise how many have been removed.
NOTE: The removed entries are NOT kept anywhere to check and verify; they are literally removed. Of course, you can use ‘Undo’ or save the file and NOT keep changes if you need to retrieve the data, but only up until the file is saved, so please check this carefully.
Cleaning Data
Often text will include spaces at the end of the text that are not relevant or useful. They can prevent formulas such as Vlookup or Match from working and can be very frustrating, as the spaces are usually invisible and can be very difficult to spot.
If this occurs frequently, you can use the ‘TRIM’ formula, which will remove any irrelevant spaces from text, leaving only single spaces in between words:

Avoiding Common Data Entry Errors
Using a Template file can be beneficial, as it can already contain Formatting, Formulas, Conditional Formatting, or Data Validation, which can help to eliminate or highlight errors… without the need to set this up from scratch.
Template files can be created when saving the file by selecting the filetype: Excel Template or Excel Macro-Enabled Template (file extension: .xltx / .xltm).
I always use ‘Protect Sheet’ (from Review ribbon) in order to prevent any accidental editing of formulas, or data that has been checked and verified. This is simple (and quick) to remove if I do need to edit anything, but it gives me time to pause to make sure I need to be making changes first.
If I am sending this to someone else to use, I would usually include a password on the protection so that I know other users will be unable to remove it.
Where possible, I always include control checks or cross-checks so that if something doesn’t quite add up or match to other data, it will be easily recognised:

In the above example, cell C8 contains a control check that will display any difference between cells C6 & F2. This can also include Conditional Formatting to make the text white if the value is zero; this way, it only displays when there is a difference to be investigated.
Conclusion
Having all of these tools available should make the task of maintaining the accuracy of data very simple, giving you confidence that your data integrity will be of a very high standard.
This means that you will be able to spend more time analysing and strategising with your data than needing to check and confirm its integrity and therefore will be able to provide more meaningful information.
Over time, others will also have an increased trust in any data you provide to them, as they have confidence that your data will be reliable.