As a former PA turned small business owner, Vickie Sokol Evans has always worn multiple hats
Like you, I need to make sure that nothing falls through the cracks and that I’m working at my top speed. This includes automating my process for creating proposals, project plans and other Word documents, by using Styles, Style Sets & Themes.
When working in long documents or repeatedly in short documents, you can save yourself considerable amount of time by using styles.
Styles are saved sets of formatting. Not only does it save you time, but styles create a consistent and branded look for your document and makes updating the document easy, breezy. Styles also reduce formatting errors, which can prevent hours of troubleshooting and frustration later.
In this article, discover timesaving steps for creating professional-looking documents in minutes…documents that look amazing and have structure so that they are easy to manage, read and navigate. You’ll undoubtedly fall in love with Word and wonder how in the world you ever lived without styles.
WHAT ARE STYLES?
Styles are a saved collection of formatting preferences that can be repeatedly applied over and over to consistently and easily format your document. The most commonly used paragraph styles are Title, Subtitle, and Headings, among others. And of course, you can create custom styles and sets of styles to suit your needs.
Think about your documents for a moment. Your proposals, project plans, contracts, resumes, etc.
Most, if not all, of these documents have elements such as Title, Main Headings, Subheadings,
Sub-subheadings, and so on. Based on the formatting of these document elements, the reader can tell if they are looking at the Title of the document, a main heading, subheading or sub-subheading, etc. They can tell because you’ve spent significant time and effort painstakingly formatting these document elements so that they are distinguishable.
Rather than manually format each of those elements individually, you would instead, format all the Main Headings as a Heading 1 style, and all of the Subheadings of the main heading as a Heading 2 style. And the Subheadings of Heading 2 would be Heading 3, etc., all the way to Heading 9 if you had that many levels of headings in your document.
WHY STYLES
Using styles provides many benefits. The most obvious is ensuring the consistent use of formatting. Additionally using styles can save you hours of time and steps when formatting, moving content, making formatting changes, creating a table of contents, or restructuring an entire document.
The full list of benefits include:
• Quickly format your document
• Easily modify the look of your document
• Apply consistent formatting
• Navigate easily
• Apply automatic numbering
• Generate a Table of Contents in seconds
• Meet accessibility requirements
• Create a stable document
• Save time and effort
APPLY STYLES THE STYLES ENVIRONMENT
There are several areas in the Word environment you’ll need in order to work with styles: the Quick Styles Gallery, the Styles Pane, and the Navigation Pane.
THE QUICK STYLES GALLERY
The Quick Styles Gallery is located on the Home tab, in the Styles group and by default, includes the most frequently used Styles.
THE STYLES PANE
To view an alphabetical listing of the most popular styles and/or to create new styles, you’ll need the Styles Pane. The Styles Pane is accessed on the Home tab, in the Styles Group, by clicking on the dialog box launcher in the bottom right hand corner of the group as seen
in the image below.
The Styles Pane opens on the right side of your screen and beyond displaying an alphabetical list of styles as seen below, it gives you additional options to manage and create new styles, plus set options for both the Styles Gallery and Styles Pane.
THE NAVIGATION PANE
One of the most important tools you will need when working with styles is the Navigation
Pane. It’s a great way to immediately tell if your document is styled. Otherwise, you’ll use the navigation pane to navigate through your headings as well as move and select content. To open the Navigation Pane click the View tab, and in the Show group, check the box next to Navigation Pane. The Navigation Pane opens on the left hand side of the document window as seen in the image below.
Your heading levels correspond with the hierarchy of your document headings, sub headings, sub sub-headings and so on — similar to an outline.
To save even more time when applying styles, consider using the shortcut key for Repeat Last Action.
USE F4 TO REPEAT LAST ACTION
When you need to repeat the very last action in Word, you can use the keyboard shortcut [F4]. For instance, in the previous step, you applied Heading 2 style to one of your sub headings. If you want to continue applying Heading 2 for the remainder of your level 2 headings in your document, use the [F4] keyboard shortcut.
To repeat the last action
1. After making a change to text, such as applying a heading style, navigate to the next heading that needs the same style you just applied.
2. Press [F4].
3. Navigate to the next heading that needs the same style and press [F4].
4. Repeat for the remainder of the document. [F4] only repeats the very last action. For example, if you applied a heading style, and then deleted some text in a paragraph below it, only the delete action would repeat, as this was the last action taken.
SCENARIO 2: APPLY STYLES TO A POORLY FORMATTED DOCUMENT
Great news! If your document is already formatted, but not styled, this is going to be the absolute best scenario because you can use your existing formatting to instantly style your document, which will save you considerable about of time. This is the part of my presentation and demonstration that elicits tears and applause because of how much time one can save from this practice.
Note: Make sure your Navigation Pane is turned on so you can see the magic happen before your very eyes.
To use your formatting to apply built-in styles
1.First, apply your Title Style and optionally, your Subtitle, if you have one.
2.Next, starting with your existing Main Heading, click a main heading paragraph to be styled.
3.On the Home tab, in the Editing group, click Select and choose Select Text with Similar Formatting. All of the main headings in the document with the same formatting will now be highlighted.
You might want to scroll through the document to see all of the main headings that are selected.
4.Click in the Heading 1 Style from the Quick Styles Gallery or the Styles Pane, if open. The paragraphs will reflect the Style applied to it and you should see your main headings now listed in the Navigation Pane.
5.Then, go to one of the Subheadings of Heading 1.
6.Repeat step 3 to Select Text with Similar Formatting. All of the subheadings should be selected.
7.Click in the Heading 2 Style from Quick Styles Gallery or the Styles Pane, if open. The paragraphs will reflect the Style applied to it and you should see the subheadings now listed in the Navigation Pane.
8.Repeat as needed for the remaining headings in your document.
SCENARIO 3: USE YOUR FORMATTING TO DEFINE THE STYLES THAT ARE APPLIED
The third scenario to consider when applying styles to your document is when you want to keep the formatting applied to your document and use your own formatting to define the styles. In this case, you don’t want to use Word’s built-in styles, you’ll want to update the built-in styles based on your formatting. This is called Update Style to Match Selection.
Note: Like the previous scenario, make sure your Navigation Pane is turned on so you can see the magic happen before your very eyes.
To use your formatting to define & apply styles
1.First, click in the Title of your document, which is nicely formatted.
2.Instead of left-clicking to apply the Word’s default Title Style, you’ll want to right-click on the Title Style in the Quick Styles Gallery or Styles Pane and choose Update Title To Match Selection. This “pushes” your formatting to the definition of the Title Style.
3.Do the same for Subtitle, if you have one.
4.Next, starting with your existing Main Heading, click a main heading paragraph to be styled.
5.On the Home tab, in the Editing group, click Select and choose Select Text with Similar Formatting. All of the main headings in the document with the same formatting will now be highlighted.
6.Right-click Heading 1 Style in the Quick Styles Gallery or Styles Pane and choose Update Heading 1 To Match Selection. This “pushes” your main heading formatting to the definition of the Heading 1 Style. You should see your main headings now listed in the Navigation Pane.
7.Next, go to one of the Subheadings of Heading 1, and repeat steps 5-6.
8.Repeat as needed for the remaining headings in your document.
Now that your document is structured with a Title, Subtitle (optional), and Headings, you can now leverage that structure to completely reformat the document instantly using Style Sets. Style Sets are a group of styles that go together. A Style Set can be used to globally apply styles to any document quickly and provide standards within a company. Here are some example Style Sets that you might create for your team.
There are 14 default Style Sets that are included in Word 2007, 2010 and 2011 for Mac. To view the default Style Sets, on the Home tab, in the Styles group, click Change Styles and select Style Set. This opens the Style Set menu and displays the list of 14 default Style Sets as seen below.
To apply a Style Set
1.Be certain that the document is styled with your Headings.
2.On the Home tab, in the Styles group, click Change Styles and select Style Set.
3.Hover over a Style Set to get a preview.
4.Click the desired Style Set to apply it to the document.
APPLY THEMES
A Theme is a set of formatting choices that
include color sets, font sets and graphic effects.
Themes can transform the document in one
click and give your documents a professional,
consistent, branded look.
To apply a Theme
1.Be certain the document has been styled and your preferred Style Set has been applied.
2.On the Page Layout tab, in the Themesgroup, click Themes.
3.Hover over a Theme to get a preview.
4.Click the desired Theme to apply it to the document.
TIP: A Theme’s Colors, Fonts can be changed individually by navigating to the Themes group on the Page Layout tab or by going to the Home tab, Styles group, click Change Styles and clicking on Colors or Fonts.
MODIFY STYLES
Now that your document is styled, and the right Style Set has been applied, and your Theme selected, it is now time to modify your Styles. Never, modify your styles until you’ve applied your Style Set and Theme. Style Sets and Themes will overwrite any changes you’ve made to your styles.
Styles can be modified one of two ways: by example, or by definition.
MODIFY A STYLE BY EXAMPLE
Modifying a Style by example means that you’ve formatted a particular heading and you now want to make that heading the “example” for the other headings. In this case, you will use that example to Update the heading to match it.
To modify a Style by example
1.Format one of your headings exactly the way you want.
2.Click within the “example” paragraph.
3.On the Home tab, in the Styles group, right-click on the Style to be updated.
4.Select Update {Style Name} to Match Selection.
MODIFY A STYLE BY DEFINITION
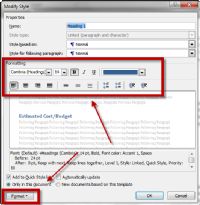
Modifying by definition means to open the Modify Style dialog box and set the formatting within the dialog box.
To modify a Style by definition
1.Click within the desired paragraph.
2.On the Home tab, in the Styles group, right-click on the Style to be updated.
3.Choose Modify… to open the Modify Style dialog box.
4.Use the Formatting options in the middle of the dialog box or click on the Format button at the bottom left hand corner of the dialog box to choose what type of format you want to apply.
5.Click Ok.
Remember! Modify a Style only after Styles, Style Sets and Themes have been applied to a document!
CREATE STYLES
In most cases, Word has all of the styles you’ll need. However, if there is specific formatting
in your document that isn’t reflected in Word’s built-in styles, create one!
To create a Style
1.Apply the desired formatting to the paragraph, if you haven’t already.
2.On the Home tab, in the Styles group, click the dialog box launcher in the bottom right hand corner of the group to open the Styles Pane.
3.Click the New Style button in the bottom left hand corner of the Styles Pane. The Create New Style From Formatting dialog box will open.
4.Name the Style.
5.Click Ok.
The new Style is created and applied to the current paragraph. It now appears in the Styles Pane and in the Quick Styles Gallery. Don’t forget to apply the new Style to the remaining areas of the document!
BEST PRACTICES
When creating a document, start with the right template if you can. Using the right template gives you access to the Styles, Style Sets and Themes needed for that document.
If there are no company templates, then begin by applying titles, subtitles and your headings first. To save you time and prevent Word from overwriting your formatting changes, I highly recommend using the following process when formatting documents using styles.
ADDITIONAL BENEFITS OF STYLES CREATE A TABLE OF CONTENTS IN SECONDS
Since you have already styled your document, the easiest way to create a table of contents is to use
the heading styles.
To create a table of contents from built-in heading styles
1.Click where you want to insert the table of contents, usually at the beginning of a document.
2.On the References tab, in the Table of Contents group, click Table of Contents, and then click the Automatic Table 1 style or the
Automatic Table 2 style.
To customize your Table of Contents
1.Click somewhere in your TO C.
2.On the References tab, in the Table of Contents group, click Insert Table of Contents to launch the Table of Contents window.
3.Configure the following settings for your
TO C:
a.S how page number (ON by default)
b.Right align page numbers (ON by default)
c.T ab leader (set to dotted tab leader by default)
d.Formats (choose your favorite)
e.Show Levels (set how many heading levels you want)
f.Options – select the Options button if you need to select additional styles to bring into your TOC
4.Click Ok.
USE YOUR HEADINGS TO NAVIGATE YOUR DOCUMENT
Once you have styles applied to your headings and subheadings, you can use those headings to navigate quickly in your document using your navigation pane.
To use the navigation pane to locate text
1. On the View tab, in the Show group, click the Navigation Pane check box.
2. Click on any heading text in the Navigation Pane to jump to that section in the document.
USE THE NAVIGATION PANE TO MOVE CONTENT
Applies only to Word 2010
It is now easier than ever to move blocks of content to another location in your document by using the Navigation Pane. This is a great way to change the order of content within your document rather
than using cut and paste or drag and drop, both of which can be risky. When you move headings
in your navigation pane, the corresponding body text for that heading will move with it.
To move content using the Navigation Pane
1.Display your Navigation Pane: On the View tab, in the Show group, click the Navigation Pane check box.
2.In the Navigation Pane, drag the heading you want to move above or below another heading in the document.
You can also right-click any heading to perform additional actions such as:
• Promoting or demoting a heading.
• Adding a new heading before or after the current heading.
• Adding a subheading.
• Deleting a heading.
Well, that completes the steps to formatting your documents in minutes using Styles, Style Sets and Themes. If you want to see many of these tips in action, I invite you to visit http://bit.l /Styles101 to preview Lesson #1 from my Styles 101 course. This will get you on your way to using styles to make your documents look more professional and polished, and best of all, to save time!”